Railway Archive Issue 10
Railway Archive Issue 10
96 pages. 275x215mm. .
ISSN 1477-5336 10
£7.50
96 pages. 275x215mm. .
ISSN 1477-5336 10
£7.50
Contents: The Railway in the Landscape, p. 2; Ferme Park, Harringay and Hornsey by Alan A. Jackson, p. 5; The Roberts Collection: Part 8: Finalé by Phil Coutanche, p. 31; Return to Stoke Works: Part 4: 1927-2005 by Basil Jeuda, p. 43; The Railway Photographs of E. Pouteau: Part 10: The Lancashire & Yorkshire Railway, The Liskeard & Looe Railway and The London, Tilbuy & Southend Railway by John Alsop, p. 65; Wish You Were Here? Postcards of the Great Northern Railway in West Yorkshire by John Alsop, p. 87
Railway Archive Issue 10 - Sample Images
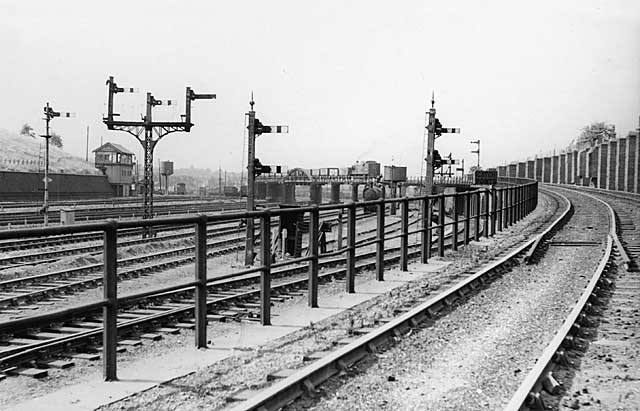
From 'The Railways of Ferme Park, Harringay & Hornsey': Looking north west from the bottom of the south ramp of the flyover on 2nd July 1955, with Ferme Park South Down Box on the far left; built into and sat partly on the retaining wall and the embankment. The signals in the forefront of the view are a mixed array of old and modern. The two nearest have been converted from GNR signals and still have GNR finials on the wooden posts. Both carry a disc signal lower down the post as well. The post nearest to the fencing applies to the adjacent Engine Line (which was reversibly worked). The top arm reads to the Up Goods No. 2 and the lower arm reads to the Up Goods No. 1 (‘top and left rule’ – the top signal reads to the route first on the left, the next arm below to the next route to the right, and so on). There was a third route, into a spur which terminated the Up Goods No. 3 line, the route to which was signalled by the disc. Just visible beyond this signal is the front face of a bracket signal. This applied to movements on the engine line in the other direction and was worked from Ferme Park South Up box, which is just visible through the flyover, to the right of the water tower. The next signal to the left in the foreground is even more interesting. It has the same configuration of arms as its neighbour, reading to the same route. It applies to the Up Goods No. 3 line, which effectively ends here, terminating in a set of buffer stops at the end of a short shunt spur. Because an over-run to this signal would have been a serious business, it has been fitted with full sized arms. Just on the approach side of this signal is a fogman’s hut. In front of it can be discerned two 4 feet high white-painted pieces of apparatus, side by side. These are the mechanically worked fogman’s repeaters to the signals that he was replicating by placing detonators on the line, showing when the related signals were ‘on’ or ‘off’. Moving to the bracket, the three arms on it were (from the back, left to right) the Home signals on the Up Goods No. 1, the Up Goods No. 2 to Up Goods No. 1 and the Up Goods No. 2 to Up Goods No. 2 lines. All the signals in the foreground were worked by Harringay West Up Goods Signal Box, except the new tubular signal which applied to the Up Slow line and was worked from Harringay Passenger Box. The working of the Viaduct lines has a complicated history. At the time this photograph was taken, they were worked as Down (on the left ) and Up lines. The signal against the sky is the Harringay West Up Goods Down Starting signal on the Down Viaduct line. Note the sprung catch points in the foreground. Later, the lines across the viaduct were singled, becoming two lines at the far end of it from here. Later still, this was changed again and the viaduct was singled all the way through to Ferme Park North Down. The train being worked across the flyover by the ‘N2’ Class tank is interesting. It was permitted to work trains from Harringay Goods to Ferme Park North Down with an assisting engine in rear. On a number of movements in this area, it was also permitted to work trains without a brake van at the rear (otherwise arranging inter-yard trips would have been a nightmare). The Down Viaduct line was not a permitted route for working without a brake van (though the Up Viaduct was!) but the men have got round the possible danger arising from a breakaway by having a locomotive on the back of the train, which was allowed. Below the ‘N2’, an ex-GNR 0-6- 0ST has paused alongside the water tower to refill its tanks. Photo Alan A. Jackson